Code 4
Google Analytics 4 (GA4) for WordPress Site Kit
As you already know a new version of Google Analytics was introduced in October 2020 that requires the usage of a Google Analytics 4 (GA4) property to track unified web and app analytics. More details on the differences between GA4 and Universal Analytics (UA) are available here.
This article will guide you the ways to upgrade your existing Universal Analytics (UA) to GA4 via the Site Kit WordPress plugin.
Beginning with version 1.36, released on July 7, 2021, Site Kit is adding the ability for users to create and add a GA4 property directly through the Site Kit interface.
Add a Google Analytics 4 property (to a site that already has Analytics)
Steps to set up a Google Analytics 4 property alongside your existing Universal Analytics property

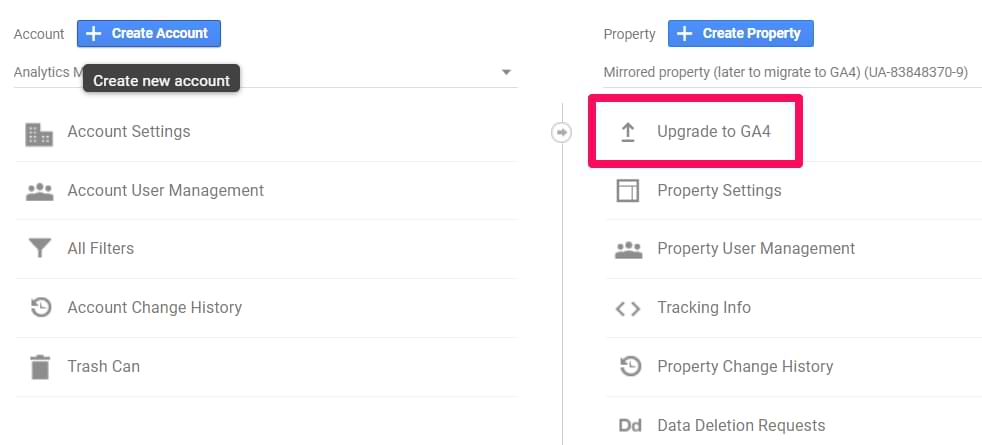
Click GA4 Setup Assistant (instructions below) to create a Google Analytics 4 property that collects data alongside your existing Universal Analytics property. Your Universal Analytics property is left unchanged and continues to collect data — you can always access it via the property selector or Admin screen.
If you use a website builder or CMS-hosted website (for example, WordPress, Shopify, Wix, etc), use your website builder’s/CMS’s custom HTML feature to tag your site. Follow these instructions. Do not simply paste your “G-” or “UA-” ID into the field that your CMS provides.
Follow all the Steps here
Important : https://sitekit.withgoogle.com/documentation/ga4-analytics-property/
Jetpack Publicize for share your site’s custom posts on social media
By default, Jetpack’s Publicize is only triggered when you publish a new post. You can, however, extend this to other Custom Post Types. You have 2 options to add Publicize Support to a Custom Post Type:
- You can add Publicize support to an existing post type thanks to the
add_post_type_support()function. To do so, add the following code to a functionality plugin or directly modifying the theme’s functions.php file. (carefully)
add_action(‘init’, ‘my_custom_init’);
function my_custom_init() {
add_post_type_support( ‘product’, ‘publicize’ );
}
You’ll need to replace “product” with your Custom Post Type name.
2. You can add Publicize support when registering the post type:
// Register Custom Post Type
function custom_post_type() {

$labels = array(
‘name’ => _x( ‘Products’, ‘Post Type General Name’, ‘text_domain’ ),
);
$args = array(
‘label’ => __( ‘product’, ‘text_domain’ ),
‘supports’ => array( ‘title’, ‘editor’, ‘publicize’, ‘wpcom-markdown’ ),
);
register_post_type( ‘product’, $args );

}
// Hook into the ‘init’ action
add_action( ‘init’, ‘custom_post_type’, 0 );
Find Your Site’s Hidden .htaccess File in cPanel
“Where is my .htaccess file?”
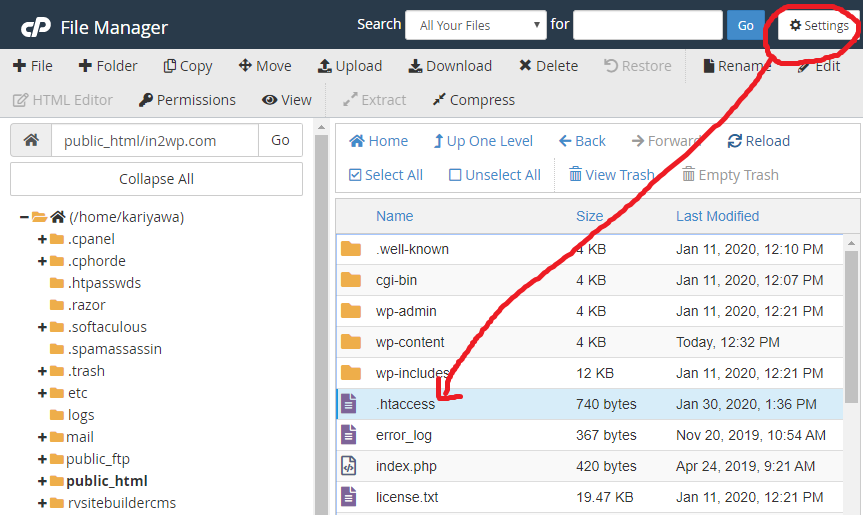
1. Access cPanel’s File Manager
2. Select Domain folder and click “Settings”
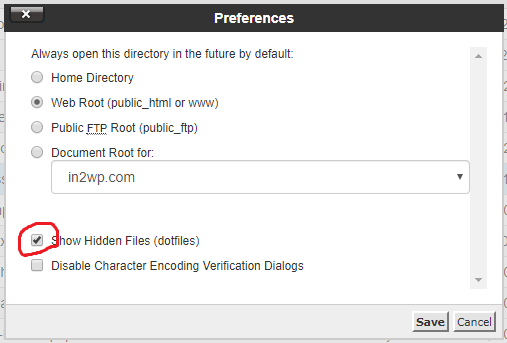
3. Select “Show Hidden Files (dotfiles)” 
How to Disable WordPress Post Revisions
Open wp-config.php located in your WordPress root directory and add the following code:
define('AUTOSAVE_INTERVAL', 300 ); // seconds
define('WP_POST_REVISIONS', false );
This code will disable all future revisions to be saved and it will also increase your autosave interval from 60 seconds to 300 seconds, so it means your post will be autosaving every 5 minute instead of every minute.
Most viewed


