Security 4
How to Turn Off XML-RPC in WordPress for Enhanced Security
How to Disable XML-RPC in WordPress
XML-RPC is a remote procedure call protocol that uses XML to encode its calls and HTTP as a transport mechanism. Initially, it was a helpful component in WordPress that allowed external applications, like mobile apps, to interact with WordPress sites. For instance, it enabled functionalities such as publishing posts from a mobile device. However, XML-RPC has become a significant vulnerability in WordPress, often exploited for brute force attacks and DDoS (Distributed Denial of Service) attacks.
Disabling XML-RPC can enhance your WordPress site’s security. Here’s how you can disable XML-RPC on your WordPress site effectively:
Method 1: Using a Plugin
Using a plugin is the simplest way to disable XML-RPC if you’re not comfortable modifying your site’s code. Here’s how to do it:
- Log in to your WordPress dashboard.
- Navigate to Plugins > Add New.
- Search for Disable XML-RPC. A plugin should appear.
- Click Install Now and then Activate the plugin.
- Once activated, this plugin will automatically disable XML-RPC on your site.
Method 2: Manually Editing the .htaccess File
If you prefer or need a method without using a plugin, you can manually block access to the XML-RPC functionality by editing the .htaccess file. Here’s how:
- Connect to your website using an FTP client or through the file manager provided in your hosting control panel.
- Locate the
.htaccessfile in the root directory of your WordPress installation. - Open the
.htaccessfile and add the following code at the end of the file:# Block WordPress xmlrpc.php requests <Files xmlrpc.php> Order Deny,Allow Deny from all </Files> - Save the changes and close the file.
This code snippet will deny access to the xmlrpc.php file, effectively disabling XML-RPC.
Method 3: Using WordPress Functions
Another method involves adding code to your theme’s functions.php file:
- Access your site via FTP or through your hosting panel’s file manager.
- Navigate to your current theme’s folder, usually located at
wp-content/themes/your-theme-name. - Find the
functions.phpfile and edit it by adding the following line of code:add_filter('xmlrpc_enabled', '__return_false'); - Save the file and close it.
This snippet disables XML-RPC by adding a filter to WordPress that returns false for XML-RPC enabled checks.
Conclusion
Disabling XML-RPC on your WordPress site can significantly improve its security by reducing the risk of automated attacks. Choose one of the methods above based on your comfort level with code and plugins. Regularly updating your WordPress installation, themes, and plugins, along with implementing other security measures like using strong passwords and reputable security plugins, will help fortify your website’s defenses.
A Beginner’s Guide to Understanding rel=noopener in WordPress
If you’re a WordPress user, you may have heard of something called rel=”noopener”. But what does it mean, and why is it important? In this blog post, we’ll take a look at what rel=”noopener” is, why it’s important, and how you can use it in WordPress. Let’s get started!
What is rel=”noopener”?
Rel=”noopener” is a keyword that is used in HTML links to help ensure the security of your website by preventing malicious activity when a link to an external site is clicked on. It is important for website owners to use this keyword in order to protect their site from potential malicious attacks. Utilizing the rel=”noopener” keyword can help protect against cross-site scripting (XSS) attacks, as well as other types of malicious threats. All website owners should make sure they include the rel=”noopener” keyword when inserting external links into their HTML code in order to ensure maximum security for their website and its visitors.
For example, when you click on a link that has rel=”noopener” associated with it, the browser will open up the link in a new tab, but will not allow the linked page to access your window’s opener property, thus providing an additional layer of protection Next time you open a link in your browser, remember to check for the rel=”noopener” attribute as it will provide an extra layer of security. This attribute stops the linked page from gaining access to your window’s opener property, thus protecting your data. So make sure to always look out for that oopener when opening links online!
How to Implement rel=”noopener” in WordPress
Implementing rel=”noopener” in WordPress is easy and helps protect your site from malicious attacks. When adding links to your WordPress posts, pages, and widgets, you can add the rel=”noopener” attribute to ensure that external links open in a brand new page without any access to your current page content. This attribute can be included in the link code and helps to prevent malicious attackers from stealing data on your website. It also adds a layer of security to your WordPress site, keeping it safe from potential threats. Implementing rel=”noopener” is an important step when adding external links to WordPress, so make sure you include it each time!
This extra layer of security is essential for guarding against potential cross-site scripting (XSS) attacks. When a user clicks on an external link on your website that has the rel=”noopener” attribute included, they will be taken directly to the external webpage without any access or ability to interact with your website’s content Finally, it’s clear that adding a rel=”noopener” attribute to external links is an important security measure, as it helps keep your website and your visitors protected from potential cross-site scripting (XSS) attacks. The rel=”noopener” attribute ensures that when users click on an external link, they will be taken directly to the destination webpage without any access to or interaction with your website’s content.
To Conclude
To sum it all up, rel=”noopener” is an important HTML attribute that can help prevent malicious activities from taking place on your website. It’s not something that you’ll need to use on every single link that you create, but it is something that should be used when linking out to external websites. With a bit of knowledge and practice, implementing the rel=”noopener” attribute into WordPress can be accomplished quickly and easily. Use this guide as a starting point and you’ll be protecting your site in no time!
How to disable automatic updates in WordPress
If you’re running a WordPress site, you might want to consider disabling automatic updates. While it’s important to keep your WordPress installation up to date, automatic updates can sometimes break things. If you’re comfortable with manually updating your WordPress site, then you can disable automatic updates.
Why you might want to disable WordPress automatic updates?
One reason you might want to disable automatic updates in WordPress is if you have a custom site that you’ve spent a lot of time perfecting. If an update to WordPress breaks your site, you’ll have to spend time fixing it, which can be frustrating.
Another reason to disable automatic updates is if you’re running an older version of WordPress. Newer versions of WordPress are often not compatible with older plugins and themes, so you might have to spend time updating those as well.
Disabling automatic updates can also be a good security measure. If you’re not comfortable with WordPress automatically updating itself, you can disable the feature and update WordPress manually when you want to. This way, you can be sure that your site is not facing any version confits.
How to disable automatic updates in WordPress
There are a few different ways that you can disable automatic updates in WordPress. One way is to simply add a line of code to your wp-config.php file. You can add the following line of code to disable all automatic updates:
define( ‘AUTOMATIC_UPDATER_DISABLED’, true );
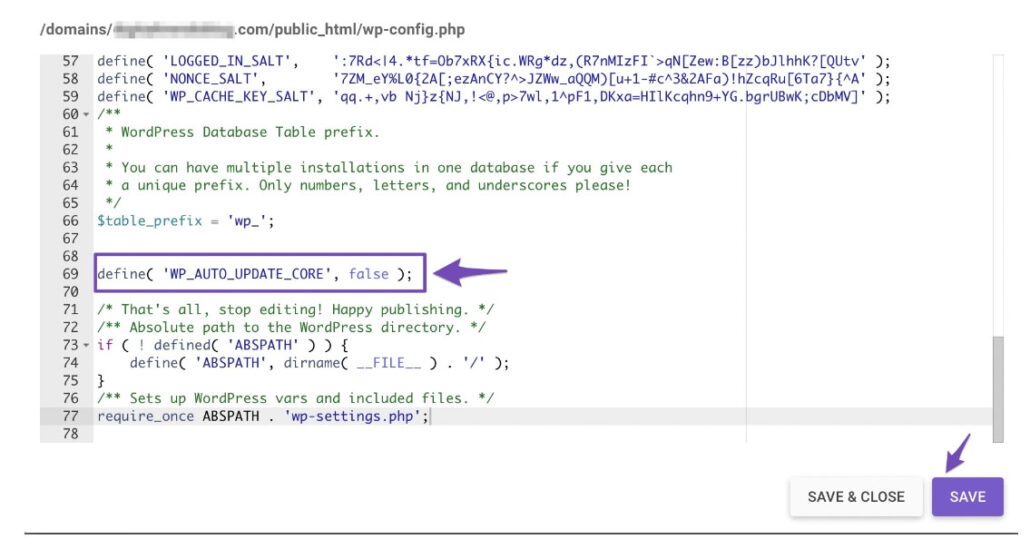
If you only want to disable certain types of updates, you can use the following lines of code instead:
define( ‘WP_AUTO_UPDATE_CORE’, false );
define( ‘AUTOMATIC_UPDATER_DISABLED’, true );
You can also disable automatic updates by installing the Disable Updates Manager plugin or Easy Updates Manager plugin. Once installed and the plugin is activated, navigate to Dashboard > Updates Options to configure the settings.
You can disable automatic updates in WordPress if you want to, but it’s generally not recommended.
You can disable automatic updates in WordPress if you want to, but it’s generally not recommended. Doing so can leave your site vulnerable to security risks and other potential issues. If you do choose to disable automatic updates, be sure to keep your WordPress installation up to date manually.
Elementor – “Server Error (403 error).”
Getting “Server Error (403 error).” while using Elementor?
I got this error when I try to do update using Elementor page builder on Consulting – Business, Finance WordPress Theme . First I thought It is some error with theme or any plugin associate with the theme. But the actual reason is the function block by the server’s security feature.
This is how I solved it
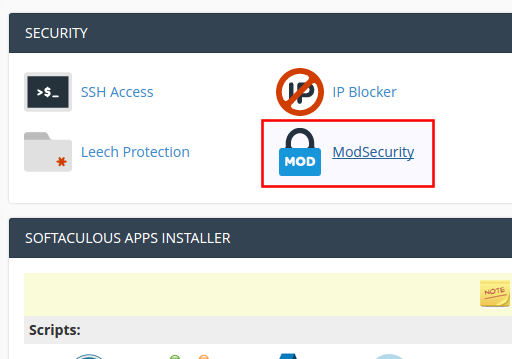
In cPanel,
under Security
Click & Go to ModSecurity
Look for user exact domain and select Off. (For all domains, ModSecurity is On by default)
Most viewed


